Wednesday, December 28, 2011

[TUT] How to get US land line number for free!


Get free US land line on your X10 Mini Pro


So, last week I wanted to sell some stuff to eBay US but I can't proceed because eBay is asking for a US land line number so they can call me and verify my account. Of course how can I get one when I'm from outside US and I really don't know anyone from there. I resorted to Google and discovered this neat trick that does only gives you a land line number but also allows incoming calls.

What I am going to use is a service called VOIP. Some of you don't know it (like me, lol) so here is a brief description of what VOIP is.

VoIP stands for Voice over Internet Protocol. It is also referred to as IP Telephony or Internet Telephony. It is another way of making phone calls, with the difference of making the calls cheaper or completely free. The ‘phone’ part is not always present anymore, as you can communicate without a telephone set.

Having said all that we will now proceed to the procedure. Please be reminded that if you follow this tutorial carefully you will most likely to get it working.

  1. First, register to IPTel using this link. Don't forget to check your email and verify your account.
  2. Now register here to get your Washington state number. Then wait for the email containing your number.

3. On your X10 Mini Pro, head on to Market and install Fring. Register for a free account.
4. Once logged in, press the menu button then tap Settings then Add-ons. Then tap SIP.

5. You should see a screen like this

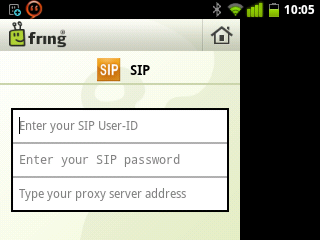
Enter these details:
SIP User-ID: Your IPtel username WITH "@iptel.org"
SIP Password: Your IPtel password
Proxy Server: iptel.org

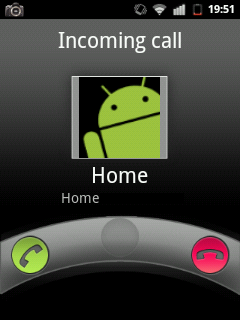
You should see a check on the SIP box when the connection is successful. You can now receive incoming calls on your very own US land line number. You may also use other apps aside Fring there are tons for free at the Android Market.

You can try if it is working by calling using iCall. It's very easy just download and install their application, dial your number and wait for your phone to ring.

Saturday, October 29, 2011

APPS: Flash Player 10.3 for X10 Mini Pro

Flash player 10.3 for X10 Mini Pro

Flash Player 10.3 for X10 Mini Pro 100% Working!

For such a long time, I've been searching for an alternative to play flash videos on armv6 devices. And as we all know, X10 Mini Pro is an armv6 device. But just recently, I've discovered this Flash Player that works on my mini pro perfectly. I can now watch streaming videos and play flash games.

Here is a screenshot of flash player running on default browser:
flash player for x10 mini pro
*NOTE* I am using GinTonic.SE rom so I don't know if it will work on stock rom. I believe this will work on any armv6 devices out there.

DOWNLOAD Flash Player 10.3

Friday, October 28, 2011

TUT: How to Install GinTonic SE ROM & ZombiePanic Kernel

How to install Gintonicse and zombiepanic kernel on x10 mini pro

Install GinTonic.SE ROM and ZombiePanic Kernel

So I got bored with my current ROM and decided to try out slade's new ROM which is GinTonic. But unfortunately this ROM requires ZombiePanic Kernel to function properly. Luckily, I managed to install it on my mini pro without bricking it (thank God) and I am going to teach you how to do it as well.


A few reminders though!

In this tutorial, we will need to unlock our phone's bootloader. What does that mean? It means that it will void your phone's warranty. So think about it first if you really want to push through with this. And lastly, please follow the instructions carefully to avoid bricking your phone. If it did, it is not my fault and am not responsible to any damage done to your phone. Intiende? Then let us proceed.

1.A. Unlocking Your Bootloader

1. Download the following files first:
2. I suggest that you flash your phone to its stock rom before proceeding for precautionary measures. You can do that using Sony Ericsson Update Service.
3. Assuming that your phone is now back in stock rom, install Flashtool. Inside the Flashtool folder, go into the sub-folder /drivers and install ggsetup.exe. Restart pc.
4. Unzip Unlocking Tools and S1tool then turn off your phone.
5. Open S1tool then click IDENTIFY then boot your phone into flash mode. (Press and hold the back button while connecting your phone into the computer) Keep holding back button until you see an output. It should be something like this:

9/9/2011 21:41:44 Welcome to S1 identify tool
9/9/2011 21:45:13
9/9/2011 21:45:13 TO CONNECT NEXT PHONES
9/9/2011 21:45:13 X10 Xperia,E10 Xperia Mini,E15 Xperia X8,U20 Xperia Mini Pro
9/9/2011 21:45:13 LT15 Xperia ARC,MT15 Xperia NEO,R800 Xperia PLAY
9/9/2011 21:45:13 PRESS AND HOLD "BACK" BUTTON...
9/9/2011 21:45:13
9/9/2011 21:45:13 PLEASE ATTACH TURNED OFF PHONE NOW
9/9/2011 21:45:13
9/9/2011 21:45:46
9/9/2011 21:45:46 RUNNING S1_EROM VER "r8A029"
9/9/2011 21:45:46 SOFTWARE AID: 0001
9/9/2011 21:45:46 LOADER AID: 0001
9/9/2011 21:45:49 FLASH ID: "002C/00BC"
9/9/2011 21:45:49 LOADER VERSION: "R4A045"
9/9/2011 21:45:49
9/9/2011 21:45:49 MODEL (from GDFS): X8
9/9/2011 21:45:49 SOFTWARE VERSION: 1236-9291_2.1.1.A.0.6
9/9/2011 21:45:49 CUSTOM VERSION: 1241-3178_R1B
9/9/2011 21:45:49 FILESYSTEM VERSION: WORLD-1-8_2.1.1.A.0.6
9/9/2011 21:45:49 SERIAL NO: CB511SPH7Q
9/9/2011 21:45:49
9/9/2011 21:45:49 SEMC SIMLOCK CERTIFICATE
9/9/2011 21:45:49 Elapsed:36 secs.

You should arrive with SEMC SIMLOCK CERTIFICATE to be able to unlock your bootloader if it didn't I'm afraid your bootloader cannot be unlocked.

6. Disconnect your phone, boot it up and enable USB Debugging.
7. Now, go to the Unlocking tools and run msm2772.cmd and wait until it finishes. Compare your output to this output, they should be similar.

process requires standard 2.x android firmware.
Press any key to continue . . .
Getting ROOT rights.
1743 KB/s (585731 bytes in 0.328s)
error: protocol fault (no status)
Waiting ...
Removing NAND MPU restrictions via SEMC backdoor. Permanent. Require ROOT rights.
192 KB/s (3087 bytes in 0.015s)
success
Waiting ...
Getting ROOT rights.
Waiting ...
Writing patched semcboot. Two step process
First, we need get access to semcboot area
504 KB/s (8064 bytes in 0.015s)
Second, we need to write semcboot ;)
1130 KB/s (596916 bytes in 0.515s)
successfully wrote 0003ff00
Press any key to continue . . .

If you got the same output, congratulations! Your bootloader is now unlocked. If it's not the same, repeat step 7.

1.B. Installing GinTonic.SE and ZombiePanic Kernel

Now that you've unlocked your bootloader, you can now install custom kernel to your phone. When I tried install ZombiePanic immediately to my phone, touch screen was not working. So here's what I did to work around this problem.
1. Download these files first:
2. Since you are in stock rom, you should 1.) Root your phone 2.) Install xRecovery & CWM Recovery
3. Put the GinTonic zip into your SD card
4. Boot into recovery and do a factory reset and wipe your dalvik cache then install custom zip and choose GinTonic.
5. Reboot your phone. If after boot it gets error, that's okay we only need to shut down your phone.
6. Unzip ZombiePanic zip and put the .ftf file into Flashtool's folder/firmwares
7. Open Flashtool and click on Flash
8. It will prompt you to boot your phone into flash mode just follow the onscreen instructions.
9. Once finished, reboot your phone and voila! You've successfully installed GinTonic.SE and ZombiePanic kernel.

1.C. Troubleshooting

If you're having trouble with the ROM and/or the kernel, please refer to their official threads:
If this method will work on other ROM's or kernels, I don't know but I think it will just try it for yourself.

Sunday, October 16, 2011

CUSTOM ROM: GingerDX pro v17

Custom ROM for x10 mini pro

Install CWM Recovery (The Easy Way)

Install CWM Recovery on X10 Mini Pro

Okay, the previous post on how to install CWM Recovery on X10 Mini Proseem to be very complicated than it should. So I'm writing a spankingnew tutorial for an easier and hassle-free installation of CWM Rec.

Wednesday, August 10, 2011

TUT: How to Install OpenVPN and Avail Free Mobile Internet

GingerDX

What is OpenVPN?

The main purpose of openvpn is to hide your real ip from the outside world by building and encrypting a private tunnel connection to a vpn server which acts like your proxy. You can have free internet by having a backdoor connection to your netwrok provider which bypasses its firewall/accounting server.

CUSTOM ROM: Froyobread

GingerDX
1 2 3

Features:


  • Clean stock CM6: Smoothness. Stability. Working Camera.
  • Minimal number of apps are installed. This brings you the choice to install and use only what you want.
  • Lightweight: I got maximum 107MB of free RAM.
  • My favorite modules: X8Gesture v007, X8Undervolt v001, X8MDDI v001
  • The usual things with other ROMs: wifi / bluetooth / usb / sensors / 3d / video / camera / rooted / jit / zipaligned / app2sd / ...
  • Gingerbread's theme with some improvements
  • Gingerbread's CRT screen on/off animation
  • CM7's Edge Glow effect.
  • CM7's Froyo/Rotary/Revamped/Lense lockscreen
  • Random lockscreen
  • Gingerbread's cursor handler
  • Gingerbread's improved copy/paste
  • Random CM6 or CM7 bootscreen
  • Better Arabic and RTL languages rendering
  • Gingerbread's localization
  • Improved Flipping down mutes ringer
  • Flipping down snoozes alarm
  • Gingerbread's LatinIME keyboard
  • Fully working T-Mobile's Theme Engine
  • Built-in Transparent Status Bar support
  • Hiding avatar in SMS
  • Quick Copy / Quick Paste
  • CallMeLouder: Louder ringer when the phone is inside bags.
  • Custom operator text
  • View.measure() method caching for improved 2D performance
  • Built-in loop ringtone support without OGG editing
  • Optimized ("smoothened") scrolling/flinging
  • Dual Recovery support
  • Xperia Active Launcher support


CUSTOM ROM: MiniCM7 Pro

GingerDX
1 2 3

Features:

  • Built for LDPI
  • MiniCM Update notifications via c2dm (CM Settings -> System -> Update notifications)
  • App2sd / Dalvik2sd compatible with 2.1 app2sd (storing to ext2/3/4 pre-existing partition is detected and mounted as such)
  • Gingerbread's native App2sd (storing to fat)
  • ClockworkMod recovery v. 3.2.0.0-r5 and option to reboot into Recovery (Encryption - Multiboot Ready!)
  • Undervolting and Overclocking handled CM Settings menu (by default none is active)
  • Extra CM Performance Settings menu for SD Read Cache Speed
  • Extra CM Settings display menu for Ultra brightness
  • Smooth 2D scrolling in menus
  • Fake Dual touch thanks to doixanh and andrej456
  • Overclocking / Undervolting thanks to doixanh
  • Mddi lag fix thanks to doixanh


CUSTOM ROM: GingerDX

GingerDX
1 2

Features:

  • Clean stock CM7. Latest Gingerbread 2.3.5.
  • Fully working Camera
  • Minimal number of apps are installed.
  • Lightweight: maximum 99MB of free RAM.
  • My favorite modules: X8Gesture v007, X8Undervolt v001, X8MDDI v001, AX8 SMARTASS
  • The usual things with other ROMs: wifi / bluetooth / usb / sensors / 3d / video / fmradio / camera / rooted / jit / zipaligned / app2sd / ...
  • Smooth. It IS as smooth as CM6 in 2D (menu scrolling/flinging...)
  • A-Theme included.
  • WEP adhoc supported
  • Dual Recovery and reboot to xRecovery/CWM
  • CallMeLouder: Louder ringer when the phone is inside bags.
  • Improved Flipping down mutes ringer
  • Flipping down snoozes alarm
  • Disable LED notification in night
  • Back button ends call
  • Built-in Transparent Status Bar support
  • Hide avatar in SMS
  • Quick Copy / Quick Paste
  • View.measure() method caching for improved 2D performance
  • Custom carrier text
  • Built-in loop ringtone support without OGG editing
  • Optimized ("smoothened") scrolling/flinging
  • Configuration section


Monday, July 4, 2011

Custom ROM: Cyanogen Gingerbread CM7

cyanogen gingerbread cm7
1 2 3

Features:

    • Wifi with 801.2 (wpa_supplicant compiled with all Crypts)
    • Bluetooth (seems to work better now)
    • Speed Tweaks for SD (thanks owain)
    • Overclocked (thank doixanh the module man)
    • regular Market
    • Headphone detection
    • Keyboard with Sony Ericsson Input (see Hardware Keyboard thread for language)
    • Xrecovery
    • the regular stuff
    • offline charging (since v10)
    • Camera low quality and camcorder with video cam illusion

      Troubleshooting:

      • If it asks you about Network SIM hit dismiss, I'll make a new build tomorrow
      • Skype crashing? Deinstall and update from market newest version fixes reboot issue
      • Gmail crashing? -> update thru market (thanks to phoxy84) or replace this : Click me
      • first Wifi activation will freeze or reboot the phone after reboot it works!
      • first creation/login of google account will fail, after reboot market should be updated and everything be fine
      • first boot and second boot take long -> this is due to odex files create a heap in the dalvik and normal cache
      • first bluetooth might fail after reboot it will be fine forever
      • languages on hardware keyboard not working -> please see this thread : Hardware Keyboards
      • if for some reason games are still not fast enough for you -> disable JIT!
      • SD card not recognized?!? -> delete any additional partitions you have on your sdcard and format again with Fat32
      • Hating that keyboard light is on when screen is on? -> Check out this thread!! Keyboard Light and other Tweaks thanks D4rKn3sSyS

      Disclaimer:

      Do this at your OWN risk. The makers of this ROM or the author of this article is not responsible for any damage on your phone.

      Requirements:

      • Baseband version must be M76XX-TSNCJOLYM-53404015
      • Kernel must be 2.6.29
      • CWM Recovery (Click here for CWM Recovery installation instructions)

      Downloads:

      Installation:

      1. First of all check if your phone meets the requirement for this ROM. Go to Settings > About Phone then check if the Baseband version and Kernel is the same with the requirements.
      2. See to it that your have CWM Recovery installed. If not, please install it first.
      3. Download the ROM. After that copy the zip file to your SD card's root folder.
      4. Restart phone, then access CWM Recovery by pressing the back button a few times when your see the white Sony Ericsson logo.
      5. At the CWM recovery, choose wipe data/factory reset and wipe cache partition
      6. After that, navigate to advanced > Wipe Dalvik Cache and Wipe Battery Stats
      7. Still at CWM Recovery, navigate to install zip from sdcard > choose zip from sdcard then choose the ROM's zip file.
      8. Wait for it to install then choose reboot system now
      9. It may take long to restart but that's normal for newly flashed phones so don't worry.

      Enjoy your flashed mini pro! As you can see, your mini pro is now running on Gingerbread while before flashing it's running on Eclair.

      Credits:

      D4rKn3sSyS for creating this ROM

      Custom ROM: FroyoComb v1.6

      cyanogen froyo cm6
      1 2 3

      Features:

        • Baseband verification
        • Dualtouch
        • OC - UV
        • CRT CM7 nice animation
        • Removed android alarms and notification sounds, you can use sony ericsson ones
        • Default player is now Honeycomb look one, removed stock
        • Honeycomb theme modded, with Honeycomb Lockscreen, thanks to original creators
        • Nice honeycomb bootanimation
        • Honeycomb clock (free)
        • Newer apps
        • kFix 1.1
        • Removed all MIUI and SE sh*t .. I dont like that
        • Removed htc_ime input method
        • Too much nice additions that you will need to see!

          Troubleshooting:

          For troubleshooting, please refer to this ROM's FAQ
          Automatic Brightness conflict with CM7 Animation: Turn off Auto Brightness
          Games Going slow: Disable JIT

          Disclaimer:

          Do this at your OWN risk. The makers of this ROM or the author of this article is not responsible for any damage on your phone.

          Requirements:

          • Baseband version must be M76XX-TSNCJOLYM-53404015
          • Kernel must be 2.6.29
          • CWM Recovery (Click here for CWM Recovery installation instructions)

          Downloads:

          Installation:

          1. First of all check if your phone meets the requirement for this ROM. Go to Settings > About Phone then check if the Baseband version and Kernel is the same with the requirements.
          2. See to it that your have CWM Recovery installed. If not, please install it first.
          3. Download the ROM. After that copy the zip file to your SD card's root folder.
          4. Restart phone, then access CWM Recovery by pressing the back button a few times when your see the white Sony Ericsson logo.
          5. At the CWM recovery, choose wipe data/factory reset and wipe cache partition
          6. After that, navigate to advanced > Wipe Dalvik Cache and Wipe Battery Stats
          7. Still at CWM Recovery, navigate to install zip from sdcard > choose zip from sdcard then choose the ROM's zip file.
          8. Wait for it to install then choose reboot system now
          9. It may take long to restart but that's normal for newly flashed phones so don't worry.

          Enjoy your flashed mini pro! As you can see, your mini pro is now running on Froyo while before flashing it's running on Eclair.

          Credits:

          D4rKn3sSyS for creating this ROM

          Custom ROM: Cyanogen Froyo CM6

          cyanogen froyo cm6
          1 2 3


          Features:

          • WLAN (also DraftN)
          • Keyboard Light (thanks to D4rKn3sSyS)
          • Bluetooth fully working
          • Lag free on Games
          • FM Radio
          • almost no Reboot Bugs
          • Head Phone Detection
          • sound recorder (Please use any from the Market)
          • Hardware Keyboard (see Hardware Keyboard Thread for help with layout)
          • LED Flash Camera can be used as Torch!!
          • and a lot more

          Troubleshooting:

          For troubleshooting, please refer to this ROM's FAQ

          Disclaimer:

          Do this at your OWN risk. The makers of this ROM or the author of this article is not responsible for any damage on your phone.

          Requirements:

          • Baseband version must be M76XX-TSNCJOLYM-53404015
          • CWM Recovery (Click here for CWM Recovery installation instructions)

          Downloads:

          Installation:

          1. First of all check if your phone meets the requirement for this ROM. Go to Settings > About Phone then check if the Baseband version is the same with the required baseband.
          2. See to it that your have CWM Recovery installed. If not, please install it first.
          3. Download the ROM. After that copy the zip file to your SD card's root folder.
          4. Restart phone, then access CWM Recovery by pressing the back button a few times when your see the white Sony Ericsson logo.
          5. At the CWM recovery, choose wipe data/factory reset and wipe cache partition
          6. After that, navigate to advanced > Wipe Dalvik Cache and Wipe Battery Stats
          7. Still at CWM Recovery, navigate to install zip from sdcard > choose zip from sdcard then choose the ROM's zip file.
          8. Wait for it to install then choose reboot system now
          9. It may take long to restart but that's normal for newly flashed phones so don't worry.

          Enjoy your flashed mini pro! As you can see, your mini pro is now running on Froyo while before flashing it's running on Eclair.

          Credits:

          slade87 for creating this ROM

          Wednesday, June 8, 2011

          Installing ClockworkMod Recovery on X10 Mini Pro


          Today I will teach you how to install ClockwordMod Recovery on x10 Mini Pro. But what is CWM Recovery? It's just like xRecovery but with more features. Let's get started.

          Installing xRecovery on X10 Mini Pro


          Now that you've rooted your mini pro (if you haven't rooted yet click here to know how), you can now install xRecovery.

          Wednesday, June 1, 2011

          How to Root Your X10 Mini Pro


          Got an X10 Mini Pro? Want to unlock all its features? Play games? All that in just a click! I'm not kidding! All you have to do is a click on your computer and you can unleash the hidden features and enjoy your awesome phone more.

          Welcome to X10 Mini Pro Hacks!


          Hi! Welcome to my blog. From now on I will post various tips, tricks, guides, news downloads or anything related to X10 Mini Pro that I find interesting and/or useful.

          I hope you find my blog useful and I hope you pick up few knowledge that I share here. So, enjoy!